Probably it’s true for most of us that even within applications that we use for years on regular basis we sometimes discover some hidden features or a different way of handling the application which we would never come to know about unless an accident happened.
Why wait for an accident!
Today I would like to share with you a few tips and tricks which I personally find very helpful in making the work of the live chat support operator easier and more efficient. I am sure you never noticed at least some of them.
So, let’s begin.
1. Copy the visitor’s nickname.
If you are like us, most likely you are using the customer’s name to greet them. It is just polite and shows your attention. At the same time, the cost of misspelling the customer’s name is quite high – the customer may perceive it as rude, or may think that the operator is inattentive and careless. It sometimes happens that the customer has an unusual name which you are not familiar with and if you try to read and write it, there is a good chance you will make a mistake. To avoid all these mishaps, you can do an easy trick – right-click on the visitor’s name in the chat tab and select the command “Copy Nickname”. Then you can return the mouse cursor into the text input field and paste the nickname through right-click and “Paste” command or “Ctrl+V” shortcut on your keyboard.
2. Switch status to “away” quickly.
If you need to step away from your computer for a few minutes, one way to change your status is to go to File → My Status menu. The shorter and faster way is to click the green “Online” link which appears just at the top of all your chat tabs and quickly switch the status to “Away”. You can change it back to “Online” as quickly on your return.

3. Save yourself from accidentally closing an active chat room with a customer.
There are situations when you have multiple chat rooms open and one of the customers has left. You need to close the respective chat tab, but your finger slips and you accidentally close a different room or even two of them together. Happened a few times to me personally. This is especially the case when you are using touchpad in your notebook. This may look extremely rude to the customer who may not suspect that it was an accident and will think you just walked out on him. To save you from this danger, there is a very handy feature which asks for confirmation before you close the room. With a double-click that you need to make, the chances of accidental closure are very remote. To turn on the feature, open the console menu Tools → Options → Rooms and check the box “ask before closing a room”.
4. Take advantage of canned responses.
Having ready-made answers to most common questions can save you time on typing identical responses over and over. My recommendation, however, would be not to overuse this feature and avoid posting long blocks of text as a single response, unless it is something that the customer is asking for and which will bring value to him. In most cases, large blocks of text will betray a canned message and the customer will not feel genuine connection with support. If you need to give instructions, it is better to refer the customer to where your company has the instructions, such as the user manual, links on the website etc. and give explanations and reference to those resources in your own language, giving the customer a feeling that he is interacting with a human.
To bring up the list of your responses, you can use the small yellow icon with the lightning in the toolbar above the text input field. To add messages in that list, you need to go to your admin panel at www.providesupport.com and open My Account/ Canned Responses screen. At this link you will find detailed instructions on how to set up and edit canned messages in your admin panel.
5. See what the customer has entered on the start chat form.
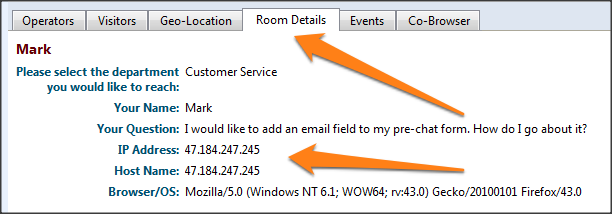
Many companies add extra fields to the start chat form asking the customers to provide their phone number, email or pretty much any other details which are important to the company. Many times the operators need to access this information before or during the chat to provide better support, but they don’t know that it is available to them. Instead they are waiting for the end of the chat so that they can look up the client’s email in the chat transcript. Note it down that all the details the client has entered on the pre-chat form are available to the operator in the Room Details tab of the chat console for as long as the chat is active. If the client has left the chat room, the information disappears from Room Details tab and then can be found only in the chat transcript.

6. Search the visitor by IP.
In most cases the caller’s row in the Visitors list of your chat console will be highlighted in green, which will allow you to easily locate all the information about the visitor. However, there are few cases when the visitor’s details may not be highlighted, such as for example when the visitor has closed the initial browser window or tab from which he started to chat with you, and reopened your website in a different window or tab. In such situations, you can manually locate the caller’s details in the Visitors list by first going to Room Details tab, copying the customer’s IP address, then coming back to Visitors tab, clicking the Find button and pasting the visitor’s IP. It is a sort of a shortcut to save you time on scrolling the whole visitors list and trying to spot the right IP visually.

7. Check the client’s referrer.
The Referrer field shows what website or link the customer has come from, or the search engine and keywords used if these details are available. Why does the operator need to check this information? It can be helpful to weed out unwanted calls from customers who are calling the wrong support or prank calls. Especially if your chat support is overloaded, this feature will allow you to give priority to genuine customers instead of dealing with obnoxious callers. Referrer field is part of your Visitors list. If you don’t see it, make sure it is enabled in your chat console menu Tools → Options → Visitors → Referrer → Show Referrer Column.

8. Know the customer’s local time.
This feature is quite handy if you have customers calling in from different time zones and different countries. Choosing a proper greeting/closure for the conversation, such as good morning/ good afternoon, have a good day/ good night, helps to create a positive impression with the customer and adds points to the quality of your support. If local time column is not visible, you can fix this in the console menu Tools → Options → Visitors → Referrer → Show Local Time Column.

9. Transfer a call to another operator.
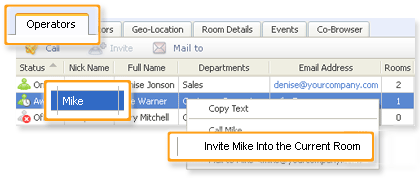
This feature is useful on a few occasions. For example, in our company we offer 24/7 support to clients. If an operator has finished the shift and needs to leave but has an active chat room, it becomes necessary that the customer is connected with another operator for further support. Sometimes additional expertise is needed and the operator can invite another operator into the chat room and they both can look into the customer’s issue and provide help. So for these cases, the operator needs to open the Operators tab of the chat console, right-click on the name of the operator to whom he would like to transfer the call or whom he would like to invite and select the option “Invite into the Current Room”. There is also a button “Invite” in the operator’s toolbar, which performs the same function.
 10. Spellchecker!
Yes, it’s nice to have someone correct your mistakes. I wish we had something like this for the mistakes that we make in life.
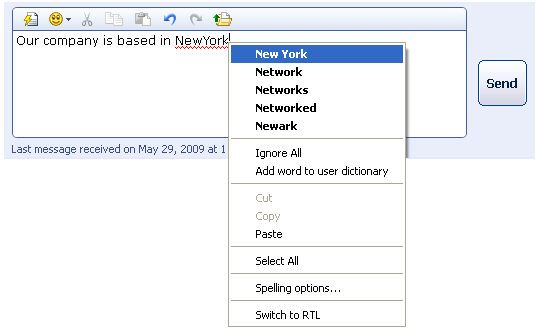
Clean language and correct spelling are important for the reputation of a company. If you carefully consider what language you use and how your messages look to the customer, the customer will feel that he is valued and respected. So take advantage of this useful feature if you haven’t done so yet. It is enabled in the operator console by default and can be tuned or disabled in the operator console menu Tools → Options → Spelling. Here is another link to our user manual where you can read more details about this feature if you need it.
 I hope you have found these tips useful and discovered for yourself at least one feature which you didn’t know about.
Please share in the comments which features of the chat console facilitate your work the most, what features you would like to be added, or perhaps some special tricks that you have come up with while using the application.
Thank you for reading!
- How Not to Lose Customers in the Busy Holiday Season - December 6, 2018
- The Goals to Set For Your Customer Service Team - October 4, 2018
- Don’t Give Your Customers a Reason To Leave - August 22, 2018


Please could you help me. I would like to cancel my inscription on a site charged on my monthly bill
could you please tell me the name of this site mentionned under this reference : keywest-support.com 844-927-9227
thanks you for your help
Hello Jaimejuan,
Please try contacting the company using other communication channel Our live chat software is not used on that website and we cannot help you, sorry.
Have a good day.
very informative content and live chat help customer instantly and they love this support from company. These tips would help me a lot. thanks mate