|
<< Click to Display Table of Contents >> Operator Module > Web-based agent app > Using the Console > Chatting > `Messaging |
General
Exchanging text messages in real time is the major feature of any live chat system. Messaging in our agent app is very simple and similar to messaging in any instant messenger.
To send a message to the visitor, please type the message in the text input area (1) and click Send (2) button or press Enter.

Messaging in agent app
1.Text input area - you can type your messages to a visitor in this area. HTML formatting is not supported in messages, but URLs and emails will become clickable after sending the message. Preview for links can be enabled or disabled in the app settings top menu
2.Send button (replaced with Invite when sending a proactive chat invitation) - you need to press this button to send a message to your visitor. You can also do this by pressing Enter on your keyboard. If there is no text entered in Text input area, the button is disabled
Since the browser app is a web page, only basic editing is available via the text input area context menu: cut, copy, paste, select all, undo. To open the context menu, please right click on the text input area.
There is a possibility to resize chat history and tabs areas in the console. Text input area is not resizeable. There is a movable area between text input and tabs areas to perform resizing.

Movable area in the console
To resize areas please do the following:
1.Put the mouse cursor over the moveable area, a double-arrow mouse pointer will appear
2.Press the left mouse button
3.Move the mouse up or down to resize the area
4.Release the left mouse button
Deleting sent messages
To permanently remove a message which was sent by an agent in the agent app for all chat participants, please do the following:
1.Right click on the message
2.Select "Delete this message" option

Deleting sent message
3.Confirm message removal

Message deleting confirmation
If deleting messages is restricted in the agent's profile, then this option will be inactive for an agent:

Deleting message restriction
Editing chat messages
An agent can edit three latest messages. To edit a message, please do the following:
1.Right click on the message you would like to edit
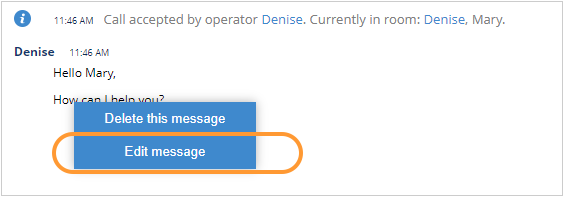
2.Select "Edit message" option

Editing messages in browser app
3.Update the text of the message and send
Please note! A permission "Editing own messages" should be activated in agent's profile. Otherwise, "Edit messages" option will be disabled.
Canned responses
To insert a canned response to the message, please do the following:
1.In the Quick texts section in your right sidebar select the response you need
2.Click 'Send' button to send it directly or click 'Insert' button to add it to your message
3.If necessary use 'Search' field to find the response. Just start typing its title

Using canned responses
Our system allows creating canned responses from the account Control Panel only if you use the browser agent app. You can do this in the account Control Panel, Canned Responses page. If you don't have an access to the account Control Panel, please contact your account administrator to add, edit or delete canned responses. Alternatively, you can download and install our native agent app which allows creating canned responses for agents directly from the application.
File Transfer

File transfer with preview
To send a file, please do the following:
1.Drag and drop the needed file
2.or click 'send file' icon
3.After this the file will be sent and will appear in the chat messenger from visitor's end and will be visible from the app in the chat history area. Images and videos appear as a preview. You can click the file to open it in a separate window and enlarge
To download the file click  icon or the file link.
Chat transcript sending
During the chat conversation or after it an agent can send a chat transcript directly from the agent app:

Chat transcript sending
To initiate a chat transcript sending, please do the following:
1.Click 'Send chat transcript' icon
2.Insert the email address where the chat transcript should be sent to
3.Click 'Send' button
Number of concurrent chats
You can have as many chats concurrently as you can handle, we don't limit this.
Visitor Details
Extended visitor and chat room details are displayed in the right sidebar. They appear when you have an active chat with a visitor.
Extended visitor and chat room details contain general information about your visitor (they are also available in Visitors list) and information from Start Chat Form fields.
All information available in extended visitor and chat room details is passed to the chat transcript, Visitor Details section.
To expand the chat room details and predefined responses in the sidebar click special icon 

Chat details in the sidebar
1.This button opens the chat details as well as predefined responses quick access in the sidebar
2.Information fro the pre-chat survey, called from and referrer pages are displayed in this section
3.IP, browser and OS details
4.Predefined responses list with a possibility to make a search among them